google yahoo msn youtube aol wikipedia  amazone  facebook twitter


Showing posts with label Blog Template. Show all posts

Saturday, August 21, 2010

How to add external link on Pages tabs?

One of tens ideas to make navigation bar is by modify HTML. One of them is by adding pages Tabs. By default, this pages tabs will redirect the link to any static page within the blog. It would redirect to http://BLOG_NAME.blogspot.com/EXTERNAL_LINK_URL.

So, how to create an external link on the pages tabs?

This will need a little modification on your template HTML. Please save your template first before make any change.


Sunday, August 1, 2010

Widget on Specific Page

There are some case in which you may want the widget to appear or nor appear on a specific page of your blog. The example because of loading access or some other reason.

Widget is the code to add page element, both in the side bar, header or  in the footer. You can add, remove or rearrange widget from sub-tab page element under Design-tab on the dashboard.

Your widget can be seen on all your blog pages unless you wrap the widget in conditional tags. This mean that you can decide in which page your widget will displayed or not displayed

Sunday, January 10, 2010

Blog Submission to Google

Behind your effort to write any article in your blog/website, there is still another "hard" effort needed. Your job hasn't finish yet. Remember, your main purpose to have a blog or website is to promote whatever within your blog. It will need visitor to know your blog address, visit your blog and explore the contents.

Google is one of the most popular search engines where billions of internet users try to find what they need through internet. What can be found in Google are site URL/site addresses that indexed by Google. You need to submit your blog to Google to make it indexed. After your submission, google will aware that there is a new blog or link address need to be indexed. Google spider will crawl over regularly to your site.

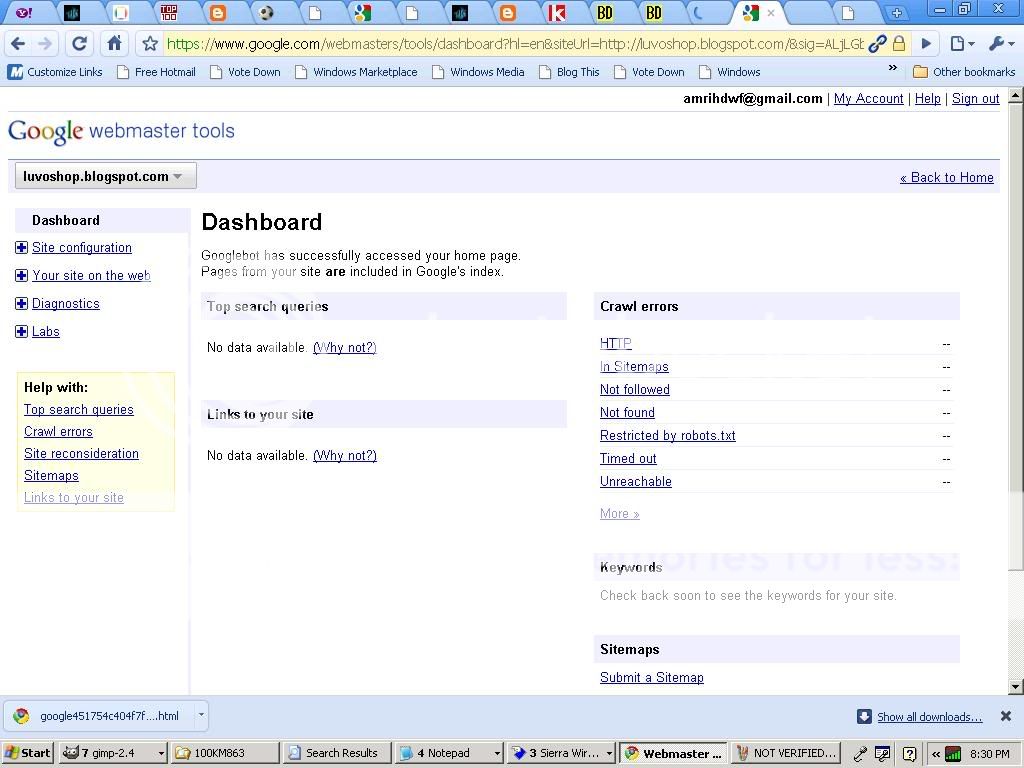
To do submission to Google you need to visit Google Webmaster Tools:
http://www.google.com/webmasters/sitemaps with your google account.

1) Under sub tab Adding a site, click Add a site.
2) Enter your URL site. In this example http://luvoshop.blogspot.com/ Then click Continue

You will be asked to verify your blog ownership and the Verification status still: Not Verified.


There are two verification methods:
a. Upload a html verification file provided by Google, or
b. Insert meta tag generated by Google.

The first method requires litle bit more effort where you need to upload the html verification file (something like this: google451754c404f7fe37.html) into your root directory and then verify upload successfully through your browser with address:[Blog URL/html verification file]In this example: http://luvoshop.blogspot.com/ google451754c404f7fe37.html

The second method, more simple, where you just need to insert meta tag, something like this:
<meta name="google-site-verification" content="t3d7FkdI0-p8iCXWrEfMI_Yi7uE3yWTtve3iYOccVCM">

within <head> section.

Let's try the second.
Note that you need to insert the meta tag first before continue to hit verify button. Login into your Dashboard, Layout, Edit HTML and find the <head> section in your Edit Template. Save your template.

Back to Google Webmaster sitemaps and click Verify. If verification success, you will be brought into your Dashboard. And when you back to Google Webmaster Tools, your blog URL Verification status become Verified.


That's all you need to submit your blog to Google.

Tuesday, December 15, 2009

How to add Comment Form in Blogger post?

Currently, blogger has provided feature to easily add comment form within your blog post. To do this, you need to log into Blogger in Draft. This is a special version of Blogger where you can try various feature, functionality and interfaces.
What you need to do is go to Dashboard>Setting>Comment. Then find Comment Form Placement setting. To embed the comment form below your post, just check on "Embedded below post". The two other options you can try if you want. This will enable Comment Form below your post. For some customized template, or if you use third party template, you can enable those Comment Form by modify your template.

Log into your blogger. From your Dashboard go to Layout>Edit HTML. Check the "Expand Widget Template".
Note: Backup your template first by copying into script editor or just simply click on Download Full Template.

1) Search for this section code:

2) Replace code in capital with this:

3) Insert this below code immediately after code in step 2
 

The complete section code will be like this:


Save your template and you will see your comment form below your blog post.


Blogger in Draft

Blogger in Draft is a special version of Blogger where Blogger team try out the new features before releasing them to everyone.

This version of "post editor" just like laboratory for Blogger. Blogger Team embed "in draft" name as an indication that their new features are something in experiment. However, you can also publish your posts from Blogger in Draft and even enjoy many new interesting features.

To log into Blogger in Draft, go to http://draft.blogger.com and in a simple step you can swicth to "normal" Blogger by log into http://www.blogger.com.

Blogger in Draft has released several features that is probably the most requested feature for blogger. Some I can listed here:

1) Embedding Comment Form in each post
By this feature your reader can easily interact by leaving their comment, question or put any information.

2) Adding Star rating to individual posts
3) Blogger as Open ID provider
With this feature you can use your blog’s URL as an OpenID URL on any website that accepts OpenID 1.1 authentication. This is one step ahead move where Blogger in Draft has allowed Open ID for commenting on Blogger blogs before.

4) AutoSave
This feature enable automatic save in certain interval while you are writing your post.

5) Scheduled Post feature
For some reason, sometimes you need to set when your article will be published. Let say you write your post today and have it automatically published in the next two days. So you can use this feature. You can read this in Scheduled Post for Blogger

6) Dictionary
At the end of 2008, Blogger in Draft is also equipped with a Dictionary with some features such as Get synonyms, Translate, Define and Look up definitions.

Blogger team also launched couple of updates and fixes in Blogger in Draft for some bugs that have previously appeared . They have fixed an Import / Export bug that was truncating the export of comments. Also, Importing scheduled posts will keep them scheduled instead of publishing them immediately.

Wednesday, November 25, 2009

Add Social Bookmarking Share Button

Social bookmarking media is one of space where you can make your widely networking and share your opinion, article or "whatever" else. Tweeter, Facebook, Digg, Delicious, and Technorati are among the most popular of social bookmarking media right now. In most of blogs or websites using those kind of button, you will find "Tweet this", "Share on Facebook", "Subcribe to Feed", "Bookmark this to del.icio.us", or "Add to Technorati" to share the post to their visitor.

To do this from your site/blog, easily you can add "share button" on to your each post. It will attract your blog visitor and make them easier to share your posts on his/her own media.

I will share to add those button by modify HTML template in Blogger, although actually several third party also provide those kind of widget that can be installed instantly.

All you need to do is:
1) Construct or just copy paste below script on your text editor. You can choose all or only script you want to add to your post.


2) Get the respective icon from internet and upload to your image hosting website (Photobucket, Picasa Web Album, ImageShack, TinyPic, VillagePhotos, etc). Note and copy the image URL address from each icon you want to add to your post. You will put these image URL address to replace "YourImage-URLaddress" at above script.

3) Log in into your Blogger-Dashboard-Layout-Edit HTML


4) Check on "expand widget template" and backup your template. This will avoid you from loosing any widget or template problem if your modification failed.

5) Scroll down and find below code:

or similar code. Within this space, you will place your share button script above immediately after the "post-footer" code. Basically, you can put your  "share button" in anywhere you want. Still in post footer,  you can also put those button within below code, immediately after 'post-footer-line post-footer-line-..' line:

or or

You can make your own experiment to see what the difference is.

6) Save your template
7) Preview your post page and you will see the share button exist on each of your post footer.

Saturday, November 14, 2009

Add Emoicon in Chatbox

By default, chatbox provider (Cbox, Shoutmix, Oggix, etc) already embed emoicon in their chatbox that we can use to represent our emotion during chat. One to another provider will provide us standard-similar emoicon.

Some time we can feel boring with those standard emoicon for any reason, such as less interactive, to small icon, not colorfull, can't repreasent our entirely feeling, etc. For those kind of reason, we can add our own emoicon by inserting emoicon in the smile feature.

We can make ourself by any icon generator or a graphics editing program or just searching in the internet.

Before start to add any new emoicon, prepare your icon(s) and upload into any website hosting.(Photobucket, Picasa Web Album, ImageShack, TinyPic, VillagePhotos, etc). This icon can be *.ico, *.jpg,*.gif or any picture extension file.

Adding emoicon in Cbox

For you who use Cbox as your chatbox, this is the steps:
1, Log in into your Cbox account
2. Go to Option
3. Click Smilies

There will be dislayed list of Cbox default emoicon. You can add new emoicon by either delete the existing one (cross sign in the last column) or by clicking New row at lower side of the list.

4. After you add New row, insert your picture URL you have uploaded into picture hosting website into URL column.
5. Fill Code and Alt.Code with your own code and Save.

New additional emoicon will be in your chatbox now


61

Wednesday, November 11, 2009

Banned by Shoutmix

In my previous post, I have shared my experience on using chat box and comparing two of them,i.e.Cbox and Shoutmix. As long as my experience, I prefer to use Shoutmix base on it's response easiness and it's self refresh feature.

A week ago, I underwent "bad" experience with Shoutmix. My blog URL has been banned by Shoutmix. When I tried to post my word, to any shoutbox on my friend blog, there will be error message:
"There are some problems with your current message. One or more website addresses you are using have been banned from the shoutbox for the reason of spamming. If you have entered website addresses, please remove them to post again"

Clear, the reason is spamming. I don't understand why my chat activity classified as spamming. I felt all of my chat is normal, and I have never intentionally spread spams.

From various informations I have got, we will be reputed doing spamming when we post chat with same word(s) to many other blog within short interval, or post rigmarole messages.

What I did in my chat was opening several blog addresses and write my message and then sent it, meanwhile I was waiting for the other blog addresses opened. Then I did the same from next blog within normal interval, 1 or 2 minutes. One more thing I have never sent rigmarole message.

I have contact Shoutmix customer service and ask to unblock my URL ban, twice. But until now, there is still no response.

To avoid contact discontinuity with all of you, I decided to change my chatbox to Cbox. I am really sorry for my visit downturn to all of you with Shoumix chatbox.

You can share your experiences......

Tuesday, November 10, 2009

My Google Page Rank

For the first time, my blog is ranked in the top 8 by Google. Top 8 mean PR 2.

Start blogging in the end of  July 2009, I just came to my dashboard and then tried to write something from what were ringing in my head. Editing my template, customizing the layout, and tried to do something to make my blog looks little bit pretty and eye catchy. What do you think my blog appearance look like now?? Yes, sure. It is still many shortcomings in one side and another. I am still learning..ha..ha.

I didn't think I'd ever get high traffic or pagerank from any site rank provider/checker. What my concern was how to make my blog worth enough to be seen, and people interesting on the articles.

After some one and half month, I started to think that the "core business" in making website or blog is to make as many as possible people over there visit my blog, reading the articles and some other time will visit my blog again. It's mean that more traffic is needed.

I tried to do many things to make my blog traffic increased, and finally today, 30 October 2009 Google has ranked my blog 2. I am very happy. There is some kind of feeling that what I have done is not useless.

Sunday, October 25, 2009

YOU ARE GRANTED

Highly appreciated to who has given me these awards. My two first and second award come from Engkong Jaya.

As the rule, I have to share and granted these awards to other.
1. My first award : ALL MY FRIENDSHIP the rule HERE>>
2. My second award : OPEN SOURCE BLOG POST the rule HERE>>

Note: This awards is voluntary, no compulsion
Here are who be granted ALL MY FRIENDSHIP award:
1. Heru http://tiara-heru.blogspot.com/
2. Rizky2009 http://rizky2009.blogspot.com/
3. Miawruu http://kucingtengil.blogspot.com/

Here are to whom I grant the OPEN SOURCE BLOG POST award:
1. Talitakum                (http://studio-talitakum.blogspot.com/)
2. Dukdukmonk          (http://dukdukmonk.blogspot.com/)
3. Heru                       (http://tiara-heru.blogspot.com/)
4. Tri Spo Yo             (http://bagi-bagirejeki.blogspot.com/)
5. Enno                       (http://visitz-indonesia.blogspot.com/)
6. MySelf Mario         (http://dirikumario.blogspot.com/)
7. Menara                   (http://lonceng-kaliptra.blogspot.com/)
8. Amin                       (http://amin-raha.blogspot.com/)
9. Agung                     (http://f2area.blogspot.com/)
10Dilarang Melarang  (http://nagapasha.blogspot.com/)

For second award, as the part of the rule, below link must be included into your site, except you have to shift one step up for each name. Rizky will disappear and then no 10 will be your Blog link.(some link are missing as no detail data from before)

1. Rizky
2. kupu.miss.oemang
3. shulayman
4. Imenoreh
5. Kluwan Love is Beauty
6. satriacell
7. eMoMySelf
8. Ikhsan
9. Menjadi Lebih baik
10.Amrih Gunawan

Happy blogging..


Saturday, October 3, 2009

Scheduled Post for Blogger

For some reason, sometimes you need to set when your article will be published, not soon after you finish the writing. This may because of your busyness, to make regular posts or for other reasons. Let say you write the article by today, and want to publish it tomorrow or the day after automatically.

In other case, sometime you want to keep any post in the top of your blog page for a while before newer post push it down.For bloggers, you can do this with Post Option on the Posting tab


This is the step:

1.Log in to your blogger account

2.Go to Edit Posts

3.From the Post list, select edit option from the respective article(s)

4.Go to Post option, click to pull it down.

5.On the right side, below your article find Post date and time.

6.Set this date and time as you prefers, in when your article will be posted.

7.Click Publish Post


Saturday, September 19, 2009

Add Comment and Post Counter in Blogger

In managing blogs/websites, sometimes we want to know how many articles we have created and published, as well as what kind of responses are given by readers or visitors of our blog. This becomes interesting because it could be one indicator of our writing productivity and how our blog has attracted the visitor. In order to fulfill those desires, we can put indicator for both. There are many king of indicator and models that we can use for this purpose, one of them as follows:

Total Posts Script


Total Comments script

With these two sripts, go to your blogger Layout--> Add Widget --> HTML/JavaScript. Copy those script into and don't forget to save. One more you can adjust by dragging your widget wherever you want. Don't forget to change the blog name (namablog) with your blog name, and widget name (Total Post/Total Comments) with your own. View your blog page or preview and find your total post and comment have been counted and displayed.

DISPLAYING HTML CODE / JAVA SCRIPT IN THE POST

To build a web page, most common tools being use are HTML (Hypertext Markup Language) and JavaScript. HTML or JavaScript, as well as its tag will not be displayed on the web page we see. What we see is normal text as an end user language or human language, whereas HTML as a machine language only works behind the scenes.
Sometimes, when we want to explain about HTML tag, as a way of writing HTML, on web pages; e.g. script package such as widgets script, table script, ordered list script, and so on, we need to show the original form of the HTML Scrip itself. For this purpose, we can not write the original script as in the draft posts, because what we will see in web page is the result of a scripting language, not the tag structure itself. In this case, we will not see what we have written. WYSIWYG (What You See Is What You Get) is not applicable.
Let’s say you have a website about web design. And let’s say you want to display the tag required for creating a horizontal wide 20% rule. Well, if you type the tag <hr width="20%"> into your code, the browser is simply going to render it as it should be (rather than output the actual code example). See example 2.
There are two ways to display HTML tag in the web page:V 1. Encode HTML or Javascript script. This can be done at several online sites such as:
a) http://www.opinionatedgeek.com
b) http://centricle.com/tools/html-entities
and many more.

2. By substituting a few tags that we want to see as it is with character entity references or numeric character references. Basically this method is manual way of the first method.
Example 1:
To display results as in figure 1 in web page, we will write the following script in the HTML template:

Figure 1

If in the code we type:

the result will be in Figure 2:
Figure 2

Example 2:
We will write as:

in the HTML template to below result (Figure 3)in web page

Figure 3
What will displayed if we type below code is shown in Figure 4, horizontal line
Figure 4
Let do your own experiment..!!

Saturday, September 5, 2009

My First Award


Wow .. thanks Kong Jaya, this is my first award. Hopefully can be a means of friendship among us, and bloggers. I will convey this award to the first 3 candidates. Hopefully in couple of days there will be 3 people fulfill below award nominee. The first 3 candidates: 1. ...... 2. ...... 3. ...... According to this award rule, whoever will get this award should pass on to others. Thanks Kong Jaya.

MY AWARDS:


awards2
Thanks to:
Engkong Jaya


award1
Thanks to:
Engkong Jaya


award1
Thanks to:
http://blogging-style.blogspot.com/


award1
Thanks to :
http://www.aneh81.co.cc/


awardgeo
Thanks to :
http://fathur-net.blogspot.com

Wednesday, July 15, 2009

SEO Tools


Link Popularity Check
How popular is your website?

example: http://amrihgunawan.blogspot.com
URL: 1
URL: 2 *
URL: 3 *
Exclude your domain from result.

Send report to an e-mail address (optional).
Email
Send in HTML format.


Please enter the access code as displayed above.
Access code
* The second and third URL is optional.

Online Link Popularity Check provide by SEOCentro.

PageRank Check
Check your website Google PageRank!

URLs (one url a line)


Please enter the access code as displayed above.
Access code

Online PageRank Check provide by SEOCentro.

Submit Express Inc.SEO Tools